How to Enable USB Debugging on Android 2025?
USB Debugging is a powerful feature on Android devices that allows for deeper communication between your phone or tablet and a computer. While primarily used by developers for testing and debugging apps, it offers several benefits for everyday users as well. This article will guide you through the process of enabling USB Debugging on your Android device.
Part 1: What is USB Debugging?
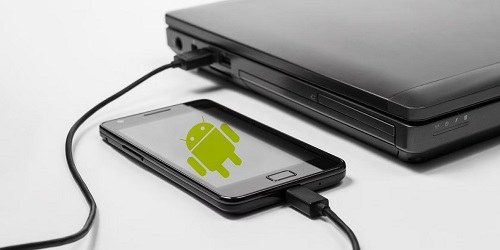
In a nutshell, USB debugging allows an Android device to interface with the Android SDK (Software Developer Kit) over USB. It enables an Android device to communicate directly with computers, allowing the Android device to receive terminal instructions, files, and so on from the computer, and the computer to retrieve critical information such as log files from the Android device.
Part 2: Why I need to enable USB Debugging Mode?
USB Debugging Mode is a feature on Android devices that allows for advanced communication between your device and a computer. While it's primarily used by developers, it has several useful applications for regular users as well. Here's why you might need to enable it:
- Development and Testing: It allows developers to connect their Android devices to a computer for app development and testing using tools like Android Studio. This connection enables the installation of apps directly from the development environment.
- Data Transfer: USB Debugging for Android facilitates easier file transfers between an Android device and a computer, allowing users to manage data efficiently.
- Using ADB Commands: It enables the execution of Android Debug Bridge (ADB) commands, which can automate tasks, install or uninstall apps, and perform system-level operations.
- Troubleshooting: Technicians can access logs and diagnostics necessary for troubleshooting device issues, making it easier to resolve problems.
Enabling USB Debugging on Android opens up a range of functionalities that enhance the user experience, particularly for developers and advanced users. Whether you're developing apps, managing files, or troubleshooting issues, this feature is an invaluable tool in the Android ecosystem. However, it's important to remember that enabling this mode can pose security risks if your device is connected to an untrusted computer, so it should be used with caution.
Part 3: How to Enable USB Debugging on Android?
The procedures to enable USB debugging on Android differ depending on the version of Android and the Android device brand. If you're not sure how to activate USB debugging on a Samsung, Huawei, Xiaomi, HTC, LG, or other device, follow the brief guide below.
1. How to Enable USB Debugging on Samsung Devices
For Samsung Galaxy S24/S21/S20/S10/S9/S8
Step 1: Unlock your phone and go to "Settings" and select "About phone".
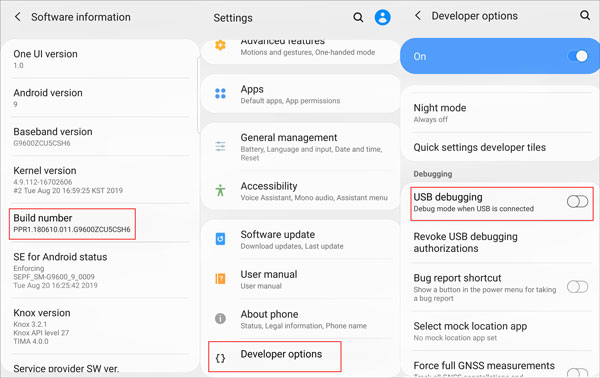
Step 2: Choose "Software information" and tap "Build number" about seven times until you see a message saying "Developer mode has been enabled".
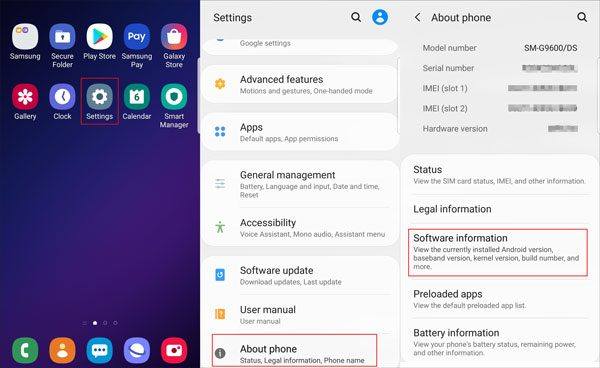
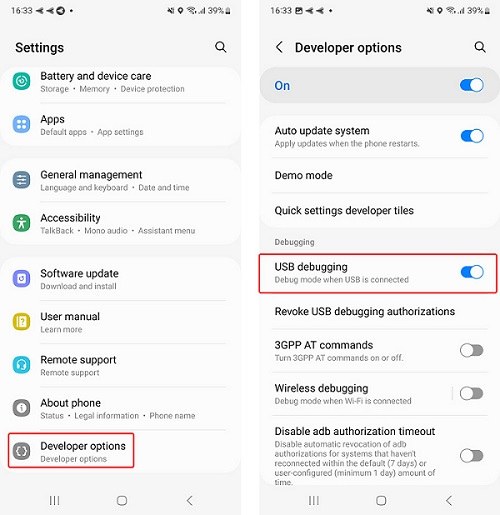
Step 3: Go back to Settings and the "Developer options" menu is now under Settings.
Step 4: Enter "Developer options" and turn on the "USB debugging" button.
Step 5: If you see a messages "Allow USB Debugging", click "OK". Now you have enabled debugging on your Samsung Galaxy successfully.
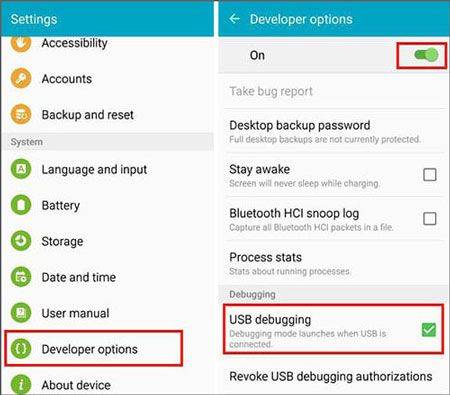
For Samsung S7/S7 Edge & Samsung Galaxy S5/S6/S6 Edge
Step 1: On your Samsung Galaxy S7/S7 Edge. Head to "Settings" > "About phone" > "Software info".
Step 2: Tap "Build number" several times until you see a message that says "Developer mode has been enabled".
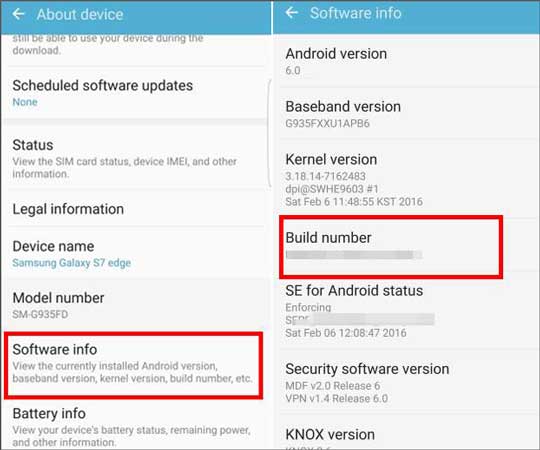
Step 3: Go back to Settings and the "Developer options" menu is now under Settings.
Step 4: Enter "Developer options" and enable "USB debugging" option.
Step 5: When you connect your Samsung phone to computer using a USB cable, you will see a message "Allow USB debugging" for connection, click "OK".
For Samsung Galaxy Note 20/10/9/8
Step 1: Turn on your Samsung Galaxy Note 20/10/9/8. Head to "Settings" > "About phone" > "Software information".
Step 2: Tap "Build number" about seven times and you will see a message saying "Developer mode has been enabled".
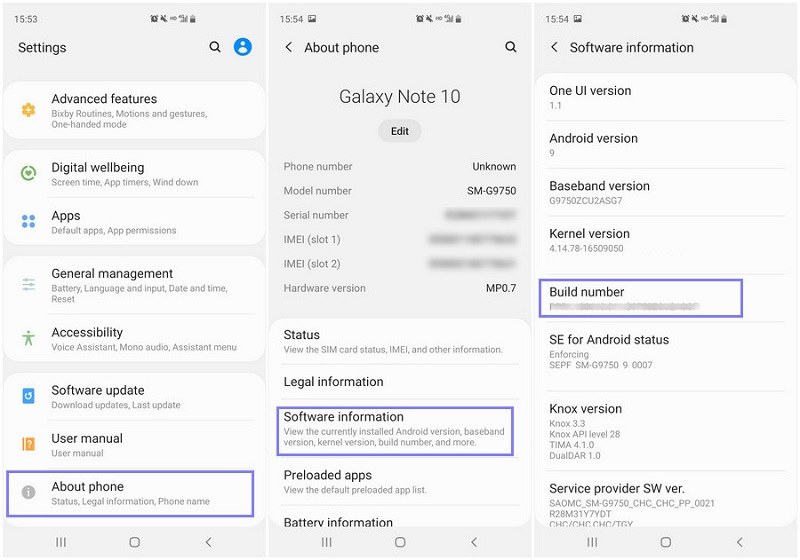
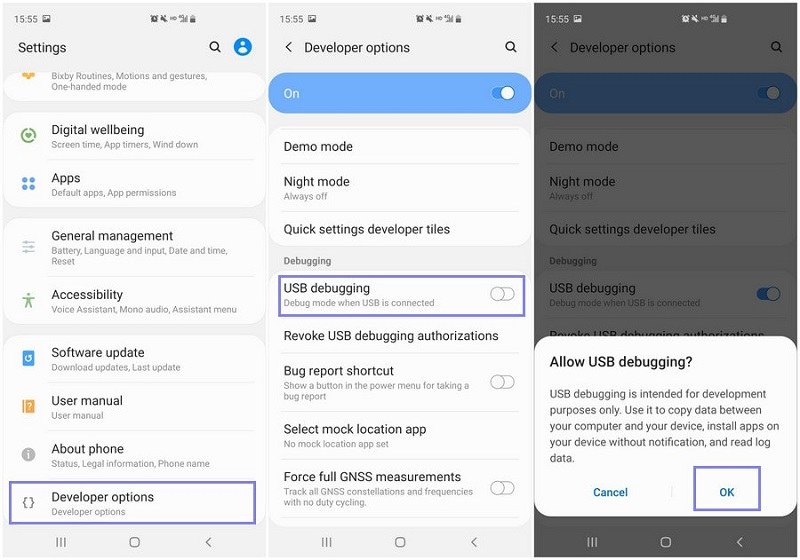
Step 3: Select on the Back button and tap on "Developer options" under Settings.
Step 4: Slide the "Developer Options" button to "On" and turn on "USB debugging". If prompted, tap OK to confirm.
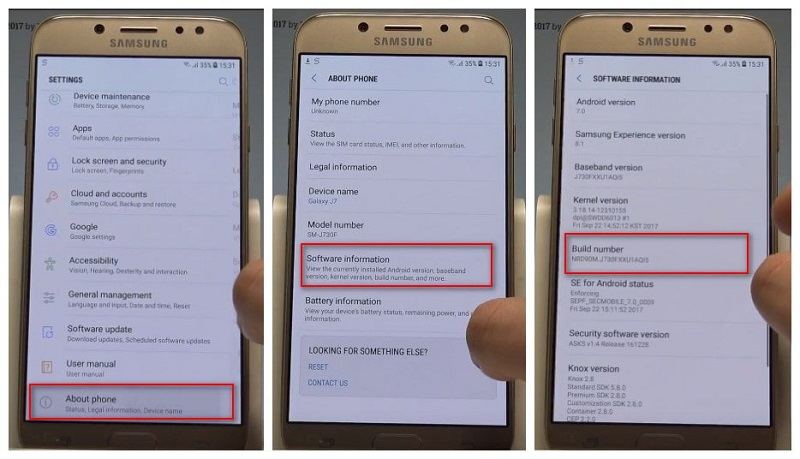
For Samsung Galaxy J2/J3/J5/J7
Step 1: Unlock your phone and go to Settings > About device > Software info.
Step 2: Scroll down the screen and tap "Build number" several times until you see a message that says "You are now a developer! /Developer mode has been enabled".
Step 3: Go back to Settings. Tap on "Developer option" and drag the switch to right to turn it on.
Step 4: Under developer option, enable "USB debugging" and you will see a message “Allow USB debugging” when you connect your phone to the computer.
2.How to Enable USB Debugging on HUAWEI Devices
For Huawei Mate 10/Mate 9/Mate 8/Mate 7
Step 1: Head to "Settings" > "About phone" at the bottom of the interface.
Step 2: Tap "Build number" about seven times until you get the prompt "You are now a developer!".
Step 3: Go back to setting and you can see the "Developer options", select Developer options.
Step 4: Turn on the “USB debugging”, and you have debugged your Huawei Mate 7 or Huawei Mate 8 successfully. Remember to tap "OK" to allow USB debugging when connect your Huawei phone to computer with the USB cable.
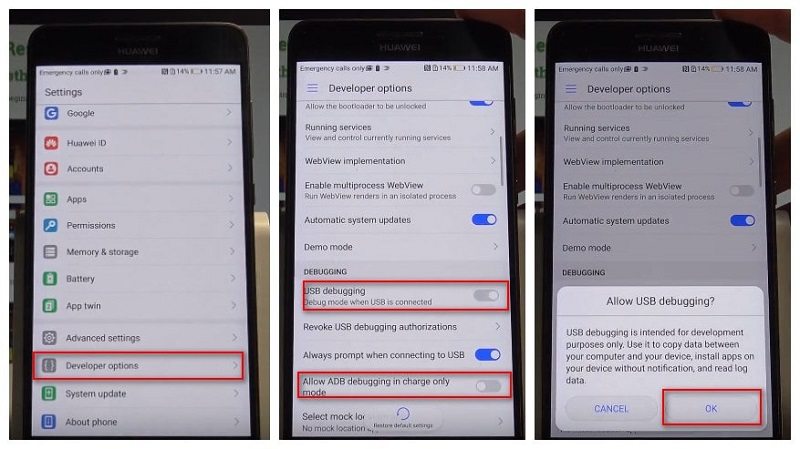
For Huawei Ascend P7/P8/P9(Plus)/P10(Plus)
Step 1: Go to "Settings" > "About phone".
Step 2: Find "Build number" and tap seven times on it until you get a message saying that "You are now a developer!".
Step 3: Return to Settings and the "Developer options" menu in now under Settings. Select Developer options.
Step 4: Enter "Developer options" and slide to turn "USB debugging" on.
Step 5: After that, when connect your Huawei phone to computer via USB cable you will see a message "Allow USB debugging". Click "OK" to allow a connection.
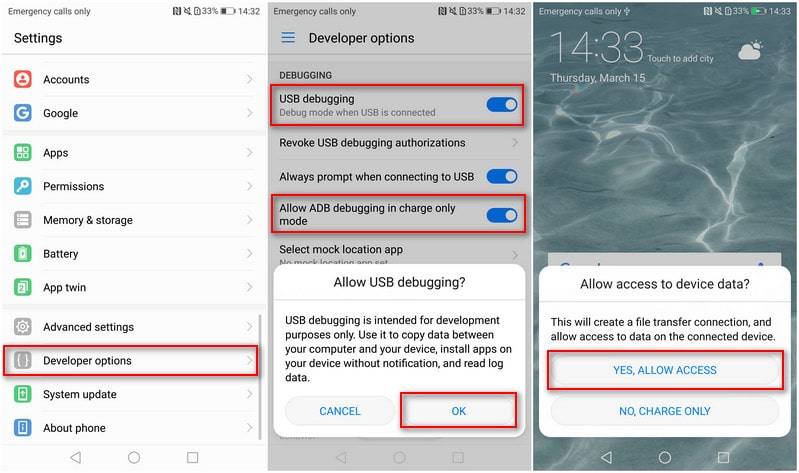
For Huawei Honor 20/10/9/8/7/6
Step 1: Unlock your phone and go to "Settings" > "About phone".
Step 2: Tap "Build number" seven times until you see a message saying that " You are now a developer!".
Step 3: Now you have enabled developer option. Go back to settings and you will see "Developer options" under Settings.
Step 4: Enter "Developer options" and slide to turn on the "USB debugging".
Step 5: Now you have successfully debugged your Huawei Honor 6/7/8. Next time when you connect your phone to computer using a USB cable and see a message "Allow USB debugging", click "OK" to allow a connection.
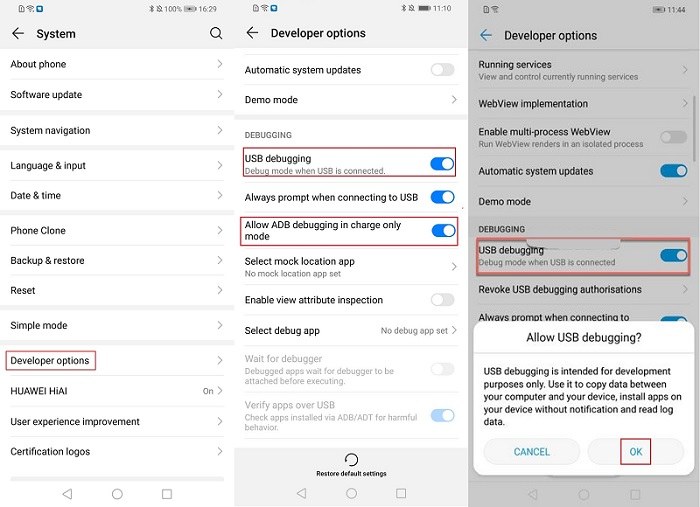
3. How to Enable USB Debugging on XIAOMI Devices
For Xiaomi Redmi Phone
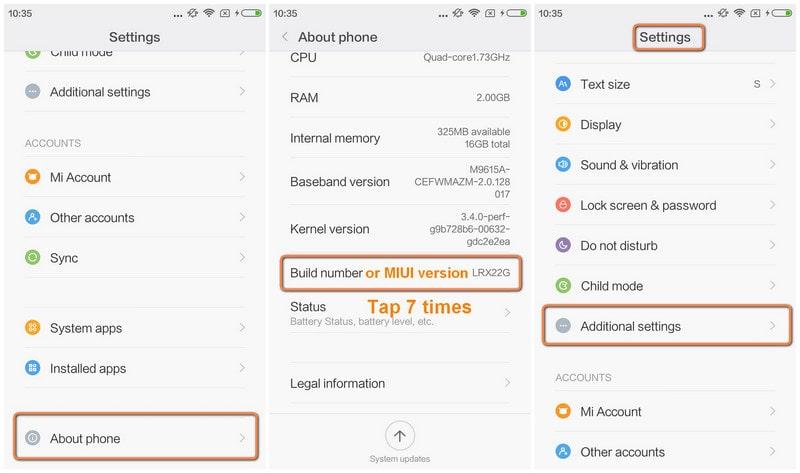
Step 1: Unlock your phone and go to "Settings" > "About device/phone"
Step 2: Find and tap on "MIUI version" several times until you get a message "You're now a developer!".
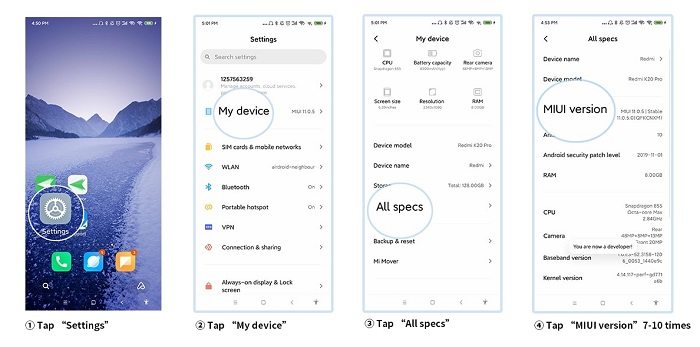
Step 3: Go back to main Settings. Tap on "Additional settings" > "Developer options" to enable it from there.
Step 4: Scroll down and slide to turn on "USB debugging" option. Now, you have Android USB debugging enabled on your Xiaomi Redmi devices successfully.
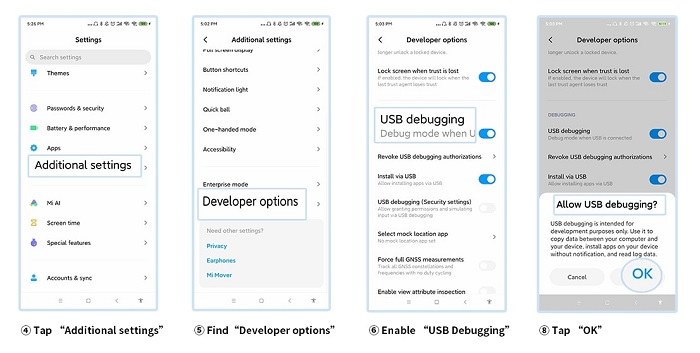
For Xiaomi Mi 11/10/9/8/6/5/4/3
Step 1: Go to "Settings" > "About phone".
Step 2: Enable "Developer Options" by tapping "MIUI version" until you see a message "You have enabled developer option".
Step 3: Tap on Back button to return. Go to "Additional Settings", and tap "Developer options" to enable it.
Step 4: Scroll down and slide the "USB debugging" button to "On". This is how to turn on USB debugging on Xiaomi Mi 9/8/6/5/4/3.
4.How to Enable USB Debugging on Other Brand Devices
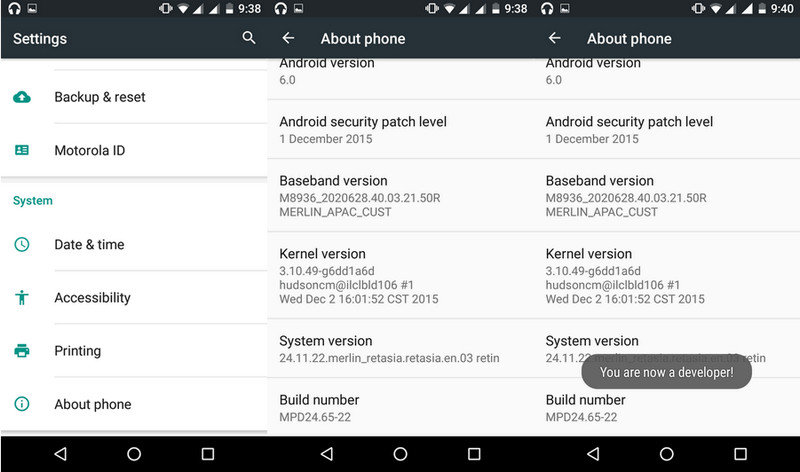
How to debug on Motorola Moto G
Step 1: Open your phone and go to "Settings" > "About phone" option and tap on it.
Step 2: Locate "Build number" and tap about 7 times until the message “You are now a developer!” appears.
Step 3: Go back to Settings and tap on "Developer option".
Step 4: Scroll down and enable USB debugging option.
How to debug on Sony Xperia Phones
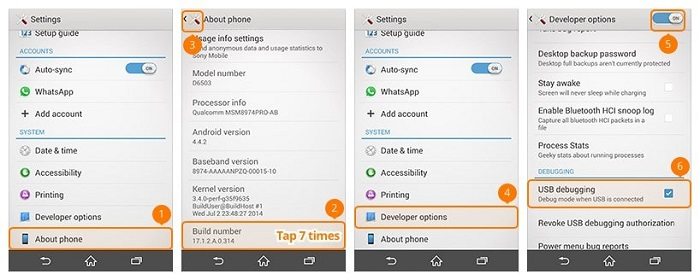
Step 1: Head to "Settings" > "About phone".
Step 2: Scroll down to find "Build number" and tap several times on it to enable Developer options.
Step 3: Back to Settings, tap on "Developer options" and then slide the "Developer options" to "On".
Step 4: Check the box next to "USB debugging", you will see a message "Allow USB debugging", click "OK".
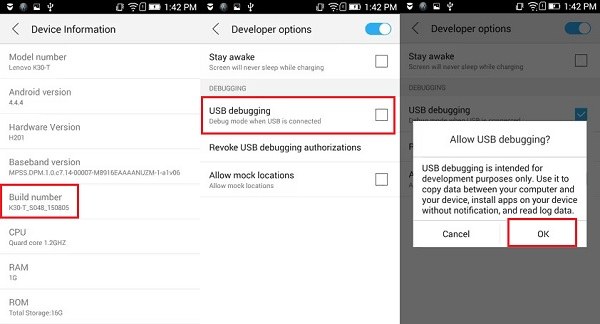
How to debug on Lenovo K8/K6/K5/K4/K3 Note
Step 1: Unlock your Lenovo K8/K6/K5/K4/K3 Note and go to "Settings" > "About phone"> "Device information".
Step 2: Find and tap "Build number" several times and you will get a message saying "Developer mode has been turned on".
Step 3: Tap on Back button to return. Tap the Developer options menu under Settings and slide to turn it on.
Step 4: Scroll down the screen and turn on "USB debugging". After finished all these steps, you have successfully done Android USB debugging on your Lenovo K5/K4/K3 Note.
Part 4: How to Turn off USB Debugging?
While USB debugging is useful, connecting your device to a computer is not secure. So turn it off when you're not using it.
Step 1: Go to Settings.
Step 2: Tap System > Developer options.
Step 3: Scroll down and slide USB debugging to “Off”.
Step 4: Wait a few minutes and the USB debugging option will be disabled on your Android device.
Conclusion
Enabling USB Debugging unlocks a range of possibilities for managing and interacting with your Android device. By following these steps and keeping the security considerations in mind, you can safely and effectively utilize this powerful feature. Remember to disable it when you're finished to protect your device from potential vulnerabilities.
 Alter GPS locations for AR games like Pokemon Go on iOS/Android devices
